Update – Cooking Tutorials & E-Books
Did you know you can watch and follow my recipes on https://www.youtube.com/@capemalaycooking/videos
My digital (electronic) E-Books are available to purchase, starting price is only R55 for one or R60 for two.
South Africans click here to purchase
Expats / other countries click here to purchase
Please support Salwaa’s Cape Malay Cooking by purchasing an E-Book.
Cape Malay Cooking; From My Kitchen To Yours – keeping our heritage alive since 2011!
Use the contact form below should you have any queries or suggestions.


Apricot Cheesecake
Indulge in a slice, or two, of delicious baked cheesecake.
Salwaa Smith – Cape Malay Cooking & Other Delights
From My Kitchen To Yours – keeping our heritage alive since 2011!

Ingredients:
For the base
1 ½ cups cake flour
1 tsp baking powder
¼ cup caster sugar
1 large egg
125g butter, plus extra for greasing
For the filling
3 large egg whites
250ml fresh cream
250ml soured cream
250g cream cheese
¾ cup caster sugar
3 large egg yolks
2 tbsp apricot juice (from the tin)
2 tbsp cornflour
For the apricot layer
410g (tin) canned apricot halves
Icing sugar for dusting
Method:
To make the base, add all the dry ingredients in a bowl. Add the other ingredients and use your hands to knead mixture into a smooth dough. Wrap in plastic wrap and leave in the fridge for 30 minutes.
Pre-heat your oven to 180°C. Grease a 22cm springform (loose bottom) cake tin. Line the base and sides of the tin with the dough. Blind bake the cheesecake base for about 10 minutes. Remove from the oven and leave to cool for 5 minutes. Lower the oven temperature to 160°C.
To make the filling, put the egg whites in a clean bowl, using a hand held electric mixer, beat the egg whites until it forms stiff peaks. In another bowl, whip the fresh cream until firm.
Add the soured cream, cream cheese, sugar, egg yolks, apricot juice and cornflour into a large mixing bowl and whisk together until smooth. Gently fold in the whisk double cream and egg whites.
Arrange the apricot halves on the base. Spread the cheesecake mixture over the apricots and smooth with a spatula.
Bake the cheesecake for 60 minutes at 160°C. Cover with foil after 40 minutes to prevent the surface from getting too brown. Turn the oven off. Leave the cheesecake to stand in the oven with the door slightly open for 15 minutes. Remove the cheesecake from the oven and leave to cool completely in the tin.
Cover loosely with foil and refrigerate for at least 8 hours or overnight.
Run a round-bladed knife around the sides of the tin to loosen any stuck edges. Unlock the side, slide the cheesecake off the bottom of the tin onto a serving plate.
Dust with icing sugar before serving.
If you like my work or the free stuff on this website and want to say thanks, or encourage me to do more, you can buy me a coffee by clicking here⤵️
SUBSCRIBE ► https://youtube.com/c/capemalaycooking
ADD ME ON:
Facebook: https://www.Facebook.com/capemalaycooking
Instagram: https://Instagram.com/capemalaycooking
Pinterest: https://Pinterest.com/capemalaycooking
Tiktok: https://tiktok.com/capemalaycooking0
Website: https://www.capemalaycookingdelights.com
Online Shop: https://capemalaycookingdelights.com/merchandise/

Samosa Recipes
With Ramadan around the corner I thought I’d share some alternative samosa fillings. Samosas are perfect to accompany your soup for Iftar or to enjoy as a light snack with your favourite dip or chutney.
Samosas are made with fried or baked pastry with a savoury filling, such as spiced potatoes, cheese & onions and minced meat (lamb, beef or chicken). The traditional mince and onion filling remains a firm favourite amongst many.
Samosas are traditionally deep fried in vegetable or sunflower oil. For a healthy alternative brush your samosas with olive oil and bake at 190ºC for 40 minutes or until golden brown and baked through. Samosas can also be air fried using the same method as for your conventional oven.
Cheese & Onion Samosa Filling
Ingredients:
2 large onions, peeled and chopped finely
200g grated cheddar cheese
2 Tbsp cake flour
1 – 2 tsp crushed red chillies
1tsp roasted masala
2Tbsp fresh coriander / dhanya
Method:
Mix the flour with the cheddar cheese to prevent the cheese from sticking together.
Add the rest of the ingredients mix gently together and fill your samosa pur.

Chicken & Corn Samosa Filling
Ingredients:
2 chicken breasts
4 cloves garlic, grated
3 – 4 green chillies, chopped
1 red pepper, finely chopped
2 Tbsp dhanya / fresh coriander
1 chicken cube
2 cups corn (drain water if using from a can)
1/2 cups mozzarella cheese (optional)
1 bunch spring onions, chopped
Method:
Boil the chicken with the chicken cube, garlic and enough water to cover till cooked, about 10 minutes.
Drain the water completely.
Allow the chicken to cool and shred into pieces.
Add the remaining ingredients.
Season with salt to taste.
Use as a filling for samosas or spring rolls.

Fajita Samosa Filling
Ingredients:
400g deboned chicken breasts (about 2 chicken breasts)
1 red pepper 1 yellow pepper 1 green pepper
2 large onions
1 Tbsp oil (olive or normal cooking oil)
½ – 1 tsp crushed red chillies
1 tsp jeera /cumin
1 tsp paprika
¼ tsp garlic powder
1 tsp salt (or to taste)
1 tsp freshly crushed black pepper
200 strong cheddar cheese
2 tsp lemon juice
Method:
Cook the chicken breasts in a little water.
Add water as needed but don’t add too much, just so it does not stick or burn to your pot.
Meanwhile chop the peppers and onions finely.
Once the chicken has cooked removed it from the pot and allow to cool.
Shred the chicken breasts into small pieces.
Heat the oil in the pot add the onions and peppers, sauté for about 5 minutes.
Add the rest of the spices, stir and cook a further 5 minutes, don’t add water.
Cool completely before adding the shredded chicken, cheese and lemon juice.
Fill your samosas as you normally would.
Serve with a chutney dip.
Learn to make samosas from scratch by following my tutorial above. You’ll learn how to make the samosa leaves / pur as well as traditional mince filling.
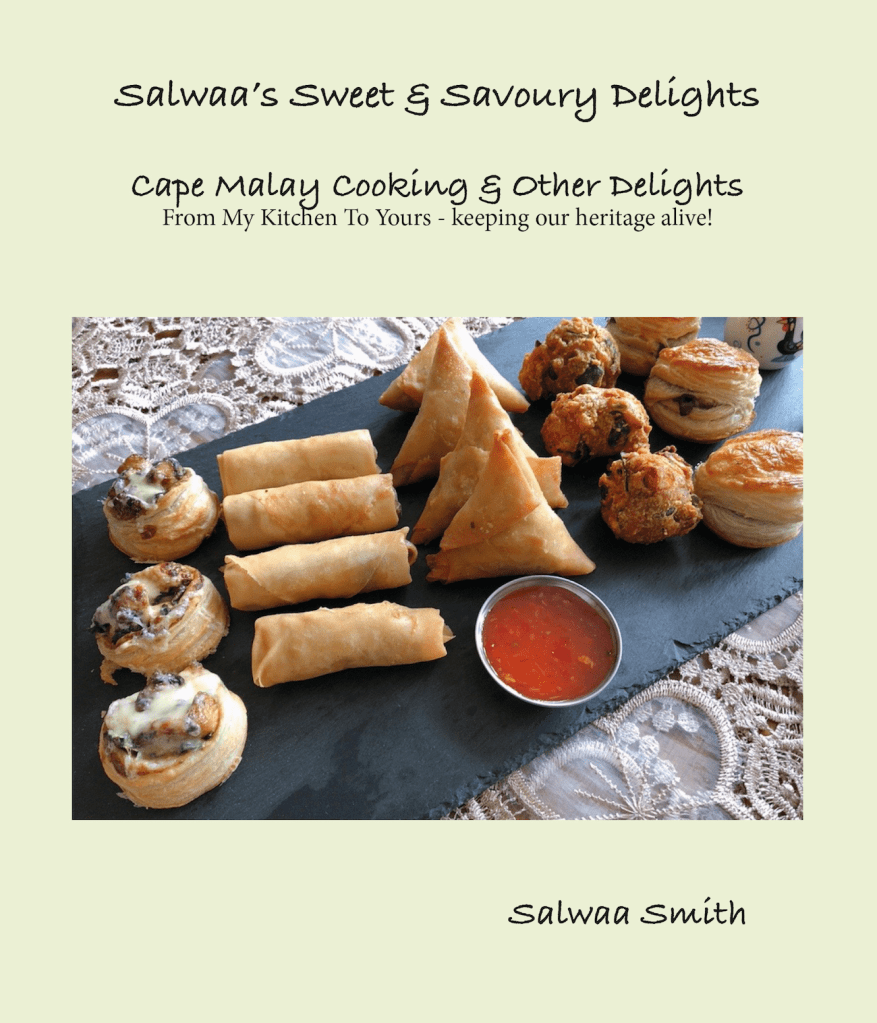
Please support @capemalaycooking by purchasing Salwaa’s Sweet & Savoury eBook for only R75


Sweet & Savoury EBook
Get ahead with your ramadan prep with my sweet and savoury ebook. Our most favourite and most asked for recipes compiled in an ebook. Please support my work by purchasing a copy of my ebook. Price is £6 or R100 each. Payment can be made in £s or Rs
Order now via WhatsApp link below⤵️
https://wa.me/p/8965638300155413/447704107431

Viennese Finger Cookie
Viennese Fingers is a delicate shortbread type of cookie with the ends dipped in rich, milk chocolate. A classic teatime treat.This is one of my most favourite biscuits to munch on. It melts in your mouth and goes so well with a hot drink. I guarantee your cookie tin won’t stay full for long!
For best results use pure butter at room temperature. Gradually add the flour to get a soft dough. I use a large star nozzle to pipe my cookies. It’s quite easy to make these impressive cookies with few ingredients.

Chocolate Dipped Viennese Biscuits
From My Kitchen To Yours – keeping our heritage alive since 2011!
Ingredients:
500g cake / plain / all-purpose flour
250g soft butter
1 cup cooking oil
1 cup icing sugar
4 dessert spoons custard powder
Method:
Cream the soft butter, oil and icing sugar in a large mixing bowl.
Stir in the custard powder and gradually add the flour. Mix well to form soft dough.
Use a nozzle to pipe “fingers”. If you find it easier transfer the dough into a strong piping bag. Otherwise just take pieces of dough in your hand and use your hand and fingers to push the dough through the nozzle. I use a large star nozzle for this.
Pipe directly onto a baking sheet lined with parchment paper. I always use parchment paper to line my sheets to prevent my cookies and bakes from sticking. I never grease my baking trays.
Bake in a pre- heated oven at 180°C for 8-10 minutes until light golden in colour.
Leave to cool in the baking sheet for 10 minutes before gently transferring onto a cooling rack to cool completely.
Meanwhile melt your chocolate in the microwave in bursts of 30 seconds until melted.
- I recommend a glass bowl with the chocolate broken into chunks.
- Then 30 second heat burst – take it out and stir.
- Repeat until just melted – always using 30 second burst of the microwave before stirring or you will burn the chocolate.
Alternatively, melt on the stove top using a bain-marie.
How to melt chocolate in bain-marie
- Place a bowl over a pot of simmering water. Make sure the bowl is very clean and does not have any moisture in it or else the chocolate will split.
- Warning – The bowl should not touch the surface of the water at all.
- Chop up the chocolate into small pieces and place in the bowl.
- Stir with a spatula. Always use a spatula so that no bubbles form.
- When the chocolate almost melts, remove bowl from heat and place on a towel.
- Stir with spatula until every last piece of chocolate melts completely.
- Transfer to a serving bowl and the melted chocolate is ready to use as needed.
Dip the ends in melted cooking chocolate.
Dip in crushed nuts optional

Watch how I make my Eet Sum Mor Biscuits below.

Chicken Breyani
Expats – shop my eBooks online at https://capemalaycookingdelights.com/
South Africa – shop my eBooks online at https://capemalaydelights.myshopify.com/
Read my online magazine – https://capemalaycookingdelights.com/salwaas-cape-malay-magazine/
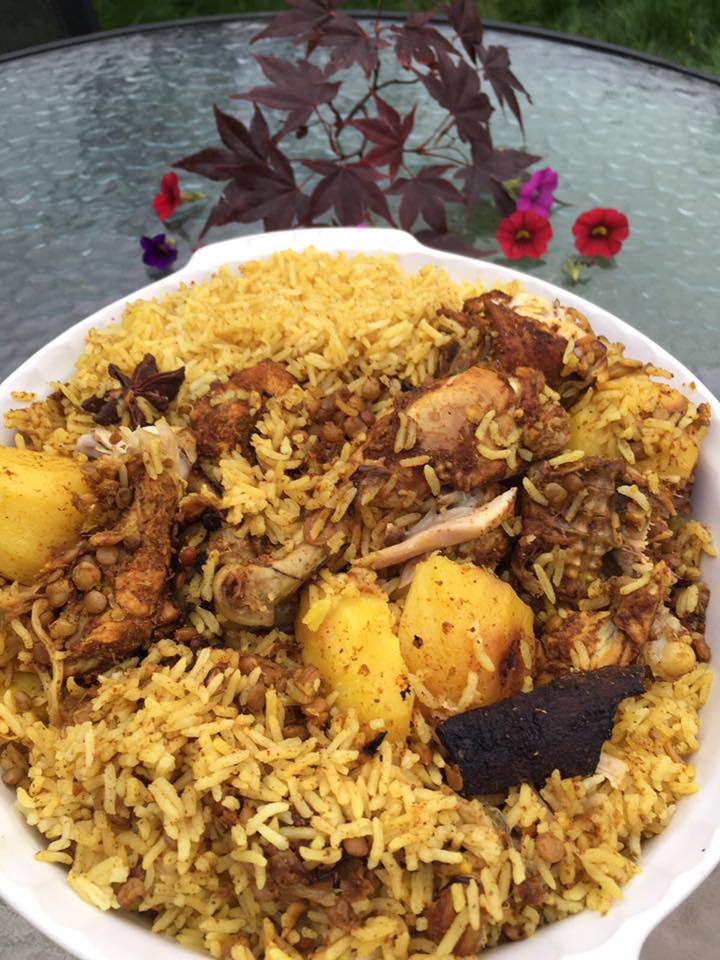
Salwaa’s Simple Chicken Breyani
No mess, no fuss, cooked in one pot from raw ingredients, no pre-cooking required. As you probably know there are hundreds of different breyani recipes out there. Each culture or country has at least one version of how to cook breyani. Alternative names: Biriyani, Biriani, Beriani, Briyani, Briani, Birani, Buriyani, Bariania, Beriani.
Biryani is a mixed rice dish originating from the Indian subcontinent. It is made with aromatic spices, rice, brown lentils and usually some type of meat, chicken or in some cases without any protein (meat). Usually fried potatoes and sometimes boiled eggs are added.
Salwaa’s Cape Malay Cooking
From My Kitchen To Yours – keeping our heritage alive since 2011!
Ingredients:
1 chicken, cut into pieces
1 teaspoon salt or to taste
1 teaspoon whole pepper corns
1 teaspoon cumin powder
1 teaspoon coriander powder
1 teaspoon whole cumin seeds
1 teaspoon whole coriander seeds
2 teaspoons roasted masala or leaf masala
1 teaspoon chilli powder
½ teaspoon turmeric
1 teaspoon whole fennel seeds
2 teaspoons garam masala
2 teaspoons freshly grated garlic
2 teaspoons freshly grated ginger
5 cardamom pods
5 allspice, pimentos
5 cloves
3 pieces stick cinnamon
3 bay leaves
3 green chillies, halved
½ cup of fresh mint leaves
½ cup fresh coriander leaves
3 medium onions braised very dark, almost burnt, in a little oil. ( keep about a tablespoon onions aside)
1 cup of plain yoghurt or buttermilk
A few strands of saffron (optional)
Method:
In a heavy based pot mix all the ingredients. Marinate for a few hours the longer the better preferably overnight.
1 cup of cooked brown lentils, optional
3-4, semi soft deep fried potatoes
4 cups of long grain or basmati rice
Cover the 4 cups of rice with boiled water.
Add 1 teaspoon of salt and tablespoon of oil, stir well and keep in boiling water for 30 minutes.
After meat is well marinated in pot, put stove on high.
Add potatoes then lentils if you using it (optional)
Strain rice and layer over meat.
Add 2 cups of boiling water.
Cover with remaining braised onions and some fresh coriander.
Dot with butter
Cover pot.
After 5 minutes turn stove down to medium heat for 10 minutes then turn on low heat for a further 20 minutes.
Dish from the bottom upwards.
Enjoy!
Expats – shop my eBooks online at https://capemalaycookingdelights.com/
South Africa – shop my eBooks online at https://capemalaydelights.myshopify.com/
Read my online magazine – https://capemalaycookingdelights.com/salwaas-cape-malay-magazine/

Eggless Vanilla Sponge Cake
Simple vanilla sponge cake with white icing and multicoloured sprinkles

The origins of the traditional old school cake recipe can be traced back to the 1980s. A wholesome treat that required only a few ingredients easily found in any household instantly became popular, still remaining an integral part of UK cuisine in modern times. In the early 20th century, it was common for schoolchildren to bring cakes and other treats from home to share with their classmates. However, with the advent of school meals, school cakes became a staple of the school lunch menu. School (vanilla) cakes have remained popular over the years due to their simplicity and affordability. They are filling and satisfying snacks that can be easily made in large batches to feed a large number of students. Additionally, school cakes are often served with a side of custard or cream, which provides added richness and texture.
Here’s my version of an eggless vanilla sponge cake. A delicious yet simple true British vanilla cake with icing and sprinkles – the classic easy bake for everyone to enjoy!
Salwaa’s Cape Malay Cooking
From My Kitchen To Yours – keeping our heritage alive since 2011!
Read my September online magazine here
Ingredients:
1⅓ cups cake / plain / all purpose flour
¾ cup granulated sugar
½ tsp baking powder
Pinch of salt
¾ cup milk
½ cup plain yoghurt
½ cup oil
1 tsp vanilla essence
Method:
Preheat oven to 180°C.
Grease and line a 7″ round cake tin. You can also use a rectangular baking tray like I did with this one.
In a bowl mix together flour, sugar, baking powder, salt and baking soda.
Add the yogurt, oil, milk and vanilla in the centre.
Mix it to form a smooth batter.
Pour it into the prepared cake tin.
Bake for 30-40 minutes or until a tooth pick inserted comes out clean.
Rest it on the wire rack for 10 minutes.
Flip on the wire rack, remove tin and the paper.
For the topping:
200g icing sugar
3 tablespoons cold water
Sprinkles
FAQ:
Why has my cake dipped in the middle?
This might happen due to over mixing, an uneven baking temperature, or short baking times.
Why has my cake risen in the middle?
The reasons include the wrong quantity of the raising agent, a wrong size baking tray, or very high baking temperatures.
How do I know that the cake is done?
Try inserting a toothpick into it; a clean toothpick is a sign that your treat is ready.
How long can this cake last?
When stored in the fridge or in a cool place in an airtight container, it can last for about 3-4 days. But I can guarantee it will be gone within one day!

Salwaa’s Cape Malay Magazine

As heritage month came to an end, I reflect back on the launch of my first edition of Salwaa’s Cape Malay Magazine. It was absolutely amazing witnessing the process coming together. A huge thank you to my editor-in-chief, my daughter, Asmaa 🙂
The aims of Salwaa’s Cape Malay Magazine are to highlight Cape Malay Cuisine and Cape Malay Culture, bringing you a new way to get all the news, advice, motivation, inspiration, recipes and much more.
We invite aspiring journalists, health care professionals to submit (voluntary, unpaid) articles for our future editions of Salwaa’s Cape Malay Magazine. Feel free to send us tried and tested recipes with photos.
We also have space for small business to advertise, get your product or service out to hundreds of thousands of prospective clients.
Please email: enquiries@capemalaycookingdelights.com for further information or if you’d like a copy of the magazine emailed to you.

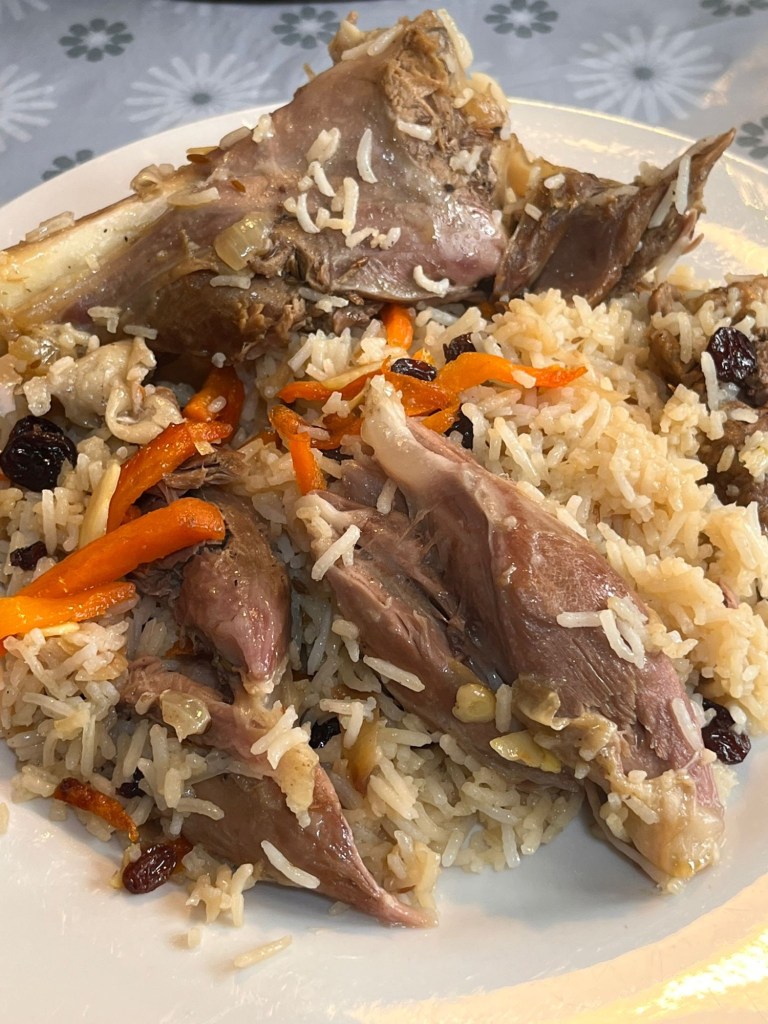
Afghani / Kabuli Pilau
We had Afghan Pilau for the first time a couple of years ago at a local Afghan restaurants. My husband loved it so much we had it on a number of occasions at a restaurant but never attempted to cook it myself. It was only when I researched the recipe that I found it was actually very easy to make. A lot of pots and pans were used in the process but very easy to assemble! When I saw the lamb shanks in our butcher I had to buy it (was £14.50 each and we bought two) and I knew already what I was going to make with it. So, this will definitely a dish that we will only make it a couple of times in the future, unless we get lamb shanks on special!

Kabuli pilau is considered a festive and important dish due to the price (of the meat) and quality of the ingredients as well as its tradition of being Afghanistan’s national cuisine. It’s usually served on special occasions. The dish is traditionally placed in the centre of the table surrounded by other foods. Top tips, don’t let your rice get sticky, it should be fluffy and the grains of rice should be “loose”. This is a very rich and tasty dish, don’t skimp on the oil!
For the meat:
- 2 – 3 large lamb shanks, you can use large lamb or mutton pieces as well
- 8 cloves garlic
- 1 black cardamom pod
- 8 green cardamom pods
- 1 tablespoon coriander seeds
- 1 tablespoon whole black pepper corns
- 1 tablespoon jeera seeds
- 5 cloves
- 3 bay leaves
- 1 large cinnamon stick
- 1 tablespoon salt or to taste
For the carrot topping:
- 4 tablespoon oil for frying
- 2 medium sized carrots, peeled and julienne cut
- 1 large handful raisins or sultanas
- 1 large handful almond slivers
- 1 tablespoon sugar
For the rice:
- 4-5 tablespoon oil
- 3 cloves garlic, finely chopped or grated
- 1 tablespoon cumin seeds
- 2 medium onions, thinly sliced
- 3 cups basmati rice, ideally you want to use a long grain basmati rice.
- Soak the rice in boiling water to cover whilst the meat is cooking.
- 1-2 teaspoons salt, to taste
Method:
- Add all the ingredients for the meat into a large pot and cover with enough water to cover all the meat. Bring to a boil and then cover, simmering for 1.5-2hrs, till the meat is tender but not falling off the bone. Top up with water if needed. Check after 1.5 hours to see if the meat is soft.
- Meanwhile, heat 3-4 tablespoon of oil in a pan, add your julienne-cut carrots. Sauté the carrots on medium heat for 5 minutes, till they are tender, don’t overcook you still want the crunch of the carrots. Add the raisins, stir fry for an additional 5 minutes, till the raisins begin to swell up. Finally, add 1 tablespoon sugar and the almond slivers, stir fry a further minute. Turn off the heat, cover with foil, set aside and keep the carrot mixture warm until needed.
- When the meat is tender, strain out the liquid stock using a colander and discard the whole spices. Reserve the stock.
- In a heavy based pot, heat 4-5 tablespoon of oil, add the cumin seeds, garlic and the onions. Sauté this on medium-high till the onions become lightly brown. You can sauté them more if you prefer a darker shade. How dark or light your onions are will affect the colour of the end result for your rice.
- Once the onions are to your desired colour, add the meat without the stock. Sauté the meat and onions for 10 minutes.
- Add the reserved stock. Bring to a boil.
- In a colander, rinse your rice until the water runs clear. Add the basmati rice and salt onto of the meat. Add more water if necessary, the water should just cover the rice.
- Cook on high heat till the water begins to boil, and then reduces, until there is very little water left in the pot. Stir once or twice using a fork, being careful not to break any rice pieces.
- At this point, reduce the heat to the lowest possible, allow it to steam like this for 10-15 minutes.
- To serve, plate the rice on a large platter topped with the meat. Scatter the raisins, nuts and carrots mixture on top.
- Serve on its own, like we did, or with a garlic yoghurt sauce.


South African Heritage Day
September is Heritage Month in South Africa, with National Heritage Day celebrated on 24 September. National Heritage Day, also known as National Braai Day was declared a public holiday in 1996. There is nothing more South African than lighting a fire and cooking a meal to enjoy with family and friends. It’s something that crosses racial, cultural, religious and social boundaries.
As we celebrate our heritage today, I’m also celebrating the launch of my NEW online magazine. I’ve been planning this project for the longest of time but never executed it as yet. So, I thought today is a good day to launch my new project!
Hope you will enjoy reading my magazine, link below. Please feel free to comment with suggestions or any improvements I can make.
Although we currently live in the United Kingdom we celebrate our heritage everyday through the traditional food we eat as well as our way of life. We love to braai and today was no exception. My husband braai-ed chicken and T-Bone steaks served with baked beans salad and potato salad. What did you do for Heritage Day?
All my traditional and authentic Cape Malay recipes can be found on www.capemalaycookingdelights.com or www,youtube.com/capemalaycooking
From My Kitchen To Yours – keeping our heritage alive since 2011!
You can support me and my work by subscribing to my social media. ADD ME ON:
Facebook: https://www.Facebook.com/capemalaycooking
Instagram: https://Instagram.com/capemalaycooking
Pinterest: https://Pinterest.com/capemalaycooking
Tiktok: https://tiktok.com/capemalaycooking0
Website: https://www.capemalaycookingdelights.com
Online Shop: https://capemalaycookingdelights.com/merchandise/

Boneless Chicken Breyani
This quick boneless chicken Breyani will not only save you time but it will score you brownie points with your family. It’s delicious, quick and easy.
Salwaa’s Boneless Chicken Breyani
Salwaa’s Cape Malay Cooking
From My Kitchen To Yours – keeping our heritage alive since 2011!

In a bowl put in the following and mix well
750 gram boneless, thigh pieces cut in pieces
2tsp salt
3 TBSP Breyani masala
1 tsp chilli powder
1/2 tsp tumeric
3 bayleaves
3 allspice
3 cloves
5 cardamom pods
2 pieces stick cinnamon
1/2 tsp coriander seeds
1/2 tsp cumin seeds
1/2 tsp peppercorns
1/2 tsp bariship/fennel seeds
1 Tablespoons garlic and ginger paste
A few tablespoons of oil
1/2 sliced onion
2 green chillies slit optional
1/2 cup of yoghurt optional
Put in fridge to marinate for a few hours or for at least a hour
Cook above for about 30 minutes. Add water as desire it should be saucy, more on the dry side not runny. Put aside.
In a bowl add 2 cups of basmati rice / long grain white rice and cover with boiling water and let it stand for 30 minutes
In the pot you going to use to cook your Breyani.
Add 2 TBSP oil
1 sliced onion
Teaspoon of garlic & ginger paste
1/2 of each robot peppers sauté for a few minutes.
Add 1 tsp salt and 1-2 cup of frozen green peas, handful of chopped coriander and a handful of chopped mint optional
Switch pot off and remove into a bowl.
Cook a few potatoes in the microwave with a little turmeric untill 3/4 done or deep fry in oil just as you like “.
Now layer your Breyani. The different aromas is the magic of making Breyani.
Layer with the potatoes at the bottom
Half of the rice without the water.
A sprinkle of salt
Followed by the marinated chicken
Now add 3/4 the onion and pepper mixture
Add the last of the rice followed by the last bit of onion and pepper mixture
Dot with butter as much or as little as you like
Add 2 cups of warm water and cook on high heat for 5 minutes.
Turn heat down to low and cook for a further 10 minutes.
Switch heat off and leave to steam for a further 10-15 minutes before serving.
If you follow this process you should get a nice fluffy and delicious loose rice.
Serve with dhai or tomato & onion salad.
Cookstip: the type of spices you use for curries and breyanis make all the difference to the taste. So make sure you buy a good quality of Breyani masala or even better mix it from scratch yourself to ensure deliciousness.
Enjoy!
Follow and subscribe for more easy recipes!

You must be logged in to post a comment.